Sitemaps play an important role in planning a new website, which can be considered a visual representation of your website, helping users find information quickly.
Sitemaps are also fundamental elements in every search engine optimization strategy. Hence, if your site has a complex structure, you or your web application development firm that is specialised in Magento should renovate your sitemap to boost optimization and ensure effective communication with search engines.
It is not difficult to create a sitemap, but you’ll need the right method to get it done properly. This blog will walk you through some basic information on sitemaps and the way to implement sitemaps in your Magento 2 store.
Table of contents
- What is a sitemap in Magento 2?
- What is an XML sitemap?
- What is an HTML sitemap?
- The importance of XML sitemaps
- The importance of HTML sitemaps
- How to generate sitemaps in Magento 2?
- Generate an XML sitemap
- Generate an HTML sitemap
- Summary
What is a sitemap in Magento 2?

A sitemap is fundamentally a navigational tool that stores links to all located resources on a site. It gives an overview of the site’s structure and content.
XML and HTML sitemaps are the two most common and vital on Magento 2 websites. XML sitemaps facilitate search engines to understand the website’s structure and index the pages better. Meanwhile, HTML sitemaps help users to discover the site and look for their favorite items quickly.
What is an XML sitemap?
An XML (Extensible Markup Language) sitemap is a plain-text file that contains all the URLs of a website. It can also add metadata to each URL.
An XML sitemap is sent to search engines like Google, then works as a guide to show the crawlers of search engines which pages are available on your site and how to access them.
It is important to remember that an XML sitemap cannot contain more than 50,000 URLs, and its uncompressed file size cannot exceed 50MB. If your sitemap excesses either of these limits, you will need to split your URLs into different sitemaps. If you are not aware about it, you can take the services of a Magento development agency for optimizing your site.
What is an HTML sitemap?
An HTML (Hypertext Markup Language) sitemap is an HTML page listing all the subpages of a site. This sitemap is often positioned in the footer of the website and visible for all website visitors.
The HTML sitemap shows your site navigation in an outline text version on one page. It acts as a geographical map for those who visit your site, assisting them in reaching their wanted resources. Therefore, it is necessary for every type of website, particularly e-commerce sites.
The importance of XML sitemaps
To make your store site appear on the search result pages when someone enters a few keywords on the search engines, you need to show search engines what part of your site is available and ready to be crawled on.
Search engine crawlers often seek a page by following links from other pages or following sitemaps.
If your Magento 2 store is new and has few external links, search engines might not find your website. Magento Store Locator and submitting a sitemap are great ideas to tell search engine bots about your site.
If your store is full of dynamic content, the pages are isolated or not well-linked to each other, implementing a sitemap can make sure search engines do not miss any important content.
If your store operates internationally and offers the same content page in different languages, an XML sitemap can notify the crawlers of this information. Search engines will utilize this information to give users the correct version of the site.
Submitting a sitemap with additional information supports Google to get what content is more crucial, then prioritize the crawling process. Finally, the metadata relevant to each page in an XML sitemap will help Google crawl and index your content more quickly.
Generally, a Magento 2 XML sitemap is an essential component that can enhance your SEO practices. A well-built and updated XML sitemap can increase the possibility that your web pages are crawled and indexed by search engines.
The importance of HTML sitemaps
A Magento 2 HTML sitemap offers customers a clear structure of your online store. If you’re running an e-commerce website with hundreds of products and categories, creating an HTML sitemap is a perfect method to provide your shoppers with a complete overview of your website and your offers.
If you let your buyers navigate your website and search for their loved items more quickly, you will create a better customer experience and gain higher conversion rates. In addition, an HTML sitemap also improves search engines’ crawling and indexing experience.
Since Google finds a page from a different page, this type of sitemap works as an excellent tool that adds internal links to each page of your online store.
How to generate sitemaps in Magento 2?
Unfortunately, Magento 2 currently does not support creating HTML sitemaps. The XML sitemap generation also has some limitations. For instance, it is impossible for store admins to include or exclude a specific object. This can make it difficult for Google bots to understand your site.
Magento 2 Sitemap extension has been launched to support the generation of both XML and HTML sitemaps.
Generate an XML sitemap in Magento 2
Log in to the Magento Admin, navigate to Marketing > Site Map, then click on the Add Sitemaps button.
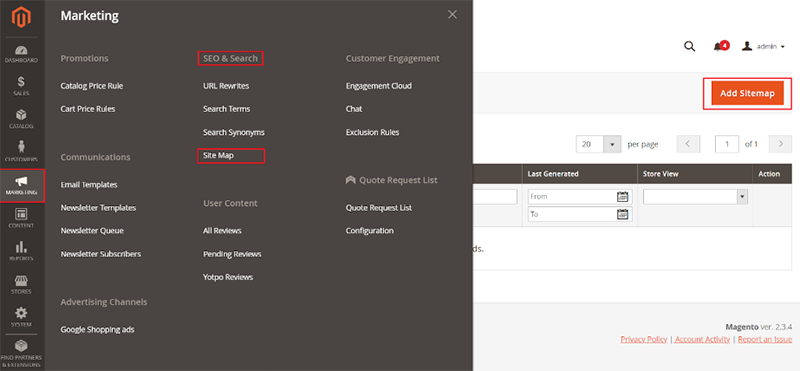
- Filename: Enter the name of the XML file
- Path: Insert the path where it will be located
Then, go to Store View and click on the Save and Generate button.

When you have completed, you can view a list of sitemaps in the grid and the generated sitemap URLs in the Link for Google column.

The last time a sitemap is created is shown in the Last Generated column.
Besides, you can generate different sitemaps for various store views. The sitemap’s store view is displayed in the Store View column.
Click on the Generate button to update or create a sitemap immediately.
A standard Magento 2 XML Sitemap includes links for products, categories, product images, and static pages.
Magento 2 also enables you to get XML Sitemap built automatically by Cron.
Within the Magento Admin, navigate to Stores > Configuration > Catalog > XML Sitemap
The first three tabs, which are Categories Options, Products Options, and CMS Pages Options, have a similar structure. Under each tab, you have to decide the Frequency and Priority for each page type.
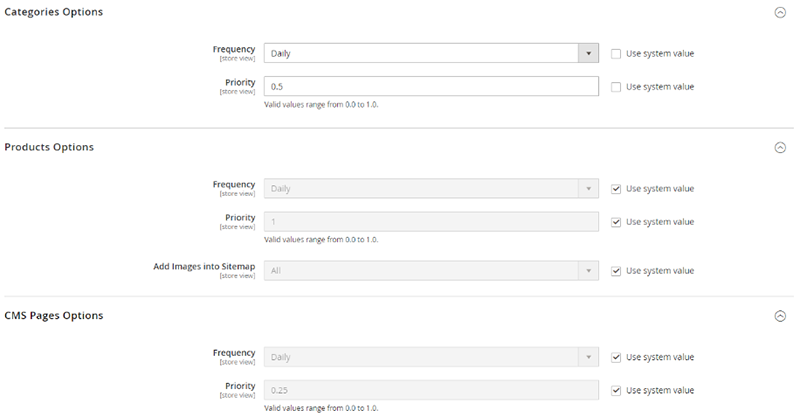
- Frequency: Display how often the page is going to change
- Priority: Set the importance level of each page
The Products Options tab offers the Add Images into Sitemap option. You can select None to include no image in the sitemap, Base Only to add only the main images, or All to assign all photos. It is suggested to add base photos due to the sitemap size limitations.
Under the Generation Settings tab, you will set the schedule of the sitemap auto-generation. This feature is only activated if your CRON is working properly.

- Enable: Select Yes to activate the sitemap auto-generation
- Start Time: The server time when a sitemap is created. It is better to set it at night when the load is minimal.
- Frequency: Show how often a sitemap is updated. You can configure it every day if your products on your store are added or changed daily.
- Error Email Recipient: Enter the email address that gets error notifications if the auto-generation fails
- Error Email Sender: Enter the email address that delivers the sitemap generation error notification
- Error Email Template: Enter the message in the error notification email
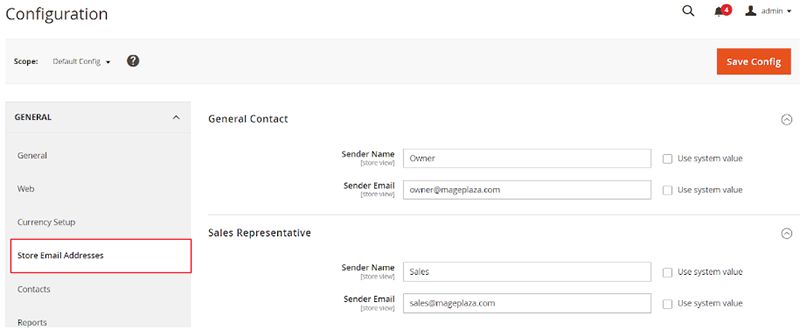
To configure the email address for these fields, navigate to Stores > Configuration > General > Store Email Addresses
Under the Sitemap File Limits section, set the sitemap limitations

Each search engine may have separate rules and limitations. Google XML Sitemap cannot include more than 50,000 URLs and exceed 50MB.
You will decide how an XML sitemap is submitted to the search engine crawlers in the Search Engine Submission Settings.

You can select Yes to Enable Submission to Robots.txt. The sitemap link will be included in robots.txt. Crawlers will read this file to understand the site indexation rules.
Generate an HTML sitemap in Magento 2
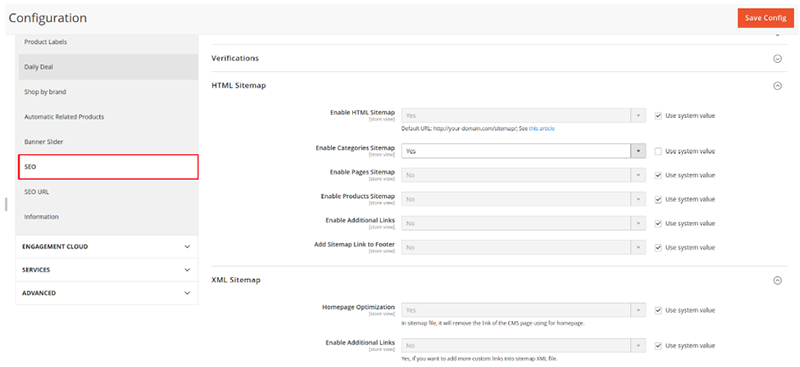
Log in to the Magento Admin, go to Stores > Configuration > SEO > HTML Sitemap
- Enable HTML Sitemap: Select Yes to enable the HTML sitemap. A new HTML sitemap configuration will be expanded.
- Enable Categories Sitemap: Select Yes to show all category pages
- Enable Pages Sitemap: Select Yes to show all pages on the website
- Enable Products Sitemap: Select Yes to show all product pages
- Enable Additional Links: If you have a number of links that cannot be automatically entered into an HTML file, select Yes to turn on this permission.
- Additional Links: Paste additional links you would like to add
- Add Sitemap Link to Footer: Select Yes to activate the advanced HTML Sitemap in the footer of pages
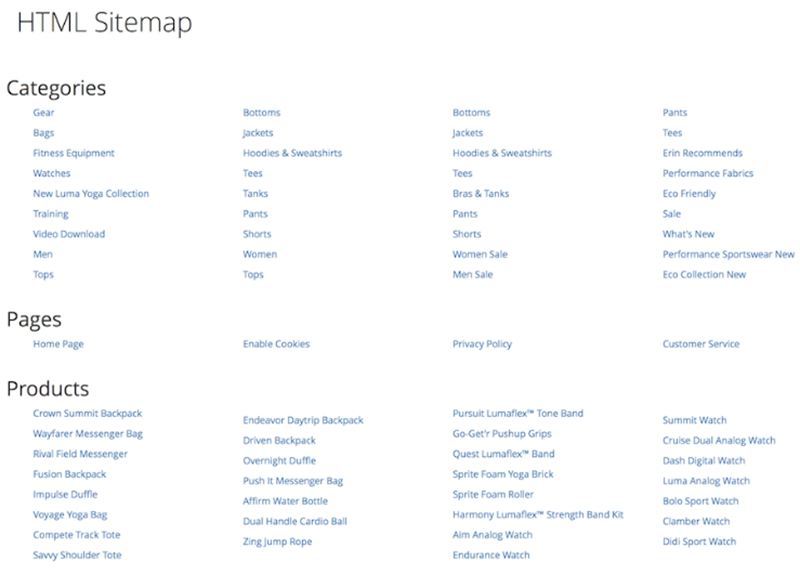
After completing these configurations, you will find an advanced HTML sitemap included in the footer of the page.

When customers click on the sitemap, they will get an overview of your site and find their favorite items with ease.
Summary
That’s all about how to generate XML and HTML sitemaps in Magento 2 stores. Hope that you have acquired a deeper understanding of sitemaps via this article. Both XML and HTML sitemaps are essential to every Magento 2 website. An XML sitemap can enhance SEO performance, while an HTML sitemap can better customer experience.


