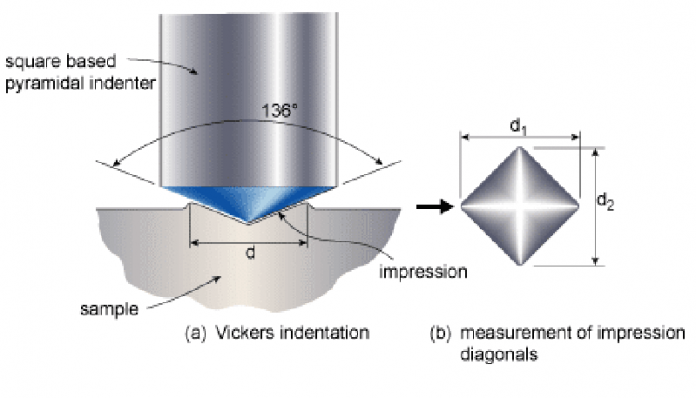
What’s the principle of Vickers hardness tester?
The Vickers hardness test is like the Brinell test. It is also commonly known as micro hardness tester. The main objective of the test is to determine the lateral surface, S, of the footprint. The indenter is a square-based diamond pyramid. It is mostly utilized in the testing of items of terrific hardness and of materials with very little parts, or with the very weak surface. An example of such material is cemented.
Vicker hardness testers are based on the Law of Similarity, which expresses: Similar bodies of a homogeneous material, when a load equal in magnitude and distribution is applied to them, receive stress and are deformed to the same degree, both inside and outside the elasticity limits and proportionally to the square of its linear dimensions. There are a number of testers to measure microhardness and microhardness.
The selection of the load is made in inverse function to its hardness. The UNE 7? 054? 73 standard establishes the different aspects of this test. As in the Brinell test, the load is applied with a minimum speed, vm, and a minimum dwell time, t, is generally required between 15 and 20 seconds.
The applications of the Vickers hardness tester
Since the Vickers hardness test is standardized in all hardness ranges, it is the most universal method for determining the hardness of an object. It can be used as a macro hardness tester or micro hardness tester.
Applications according to load range:
The Vickers hardness test is divided into three areas:
- the macro range – from 49.03N (HV5) to 980.7N (HV100)
- the low fire range – from 1.961 N (HV 0.2) to <49.03N (HV5)
- the micro range – from 0.098N (HV0.01) to <1.961N (HV0.2)
Due to the possibility of varying the test force, the Vickers hardness test method is suitable for a wide range of material conditions. Even a local characterization of individual structural components is possible with this hardness testing method. This means that the Vickers hardness test can be used more universally than the Brinell hardness test.
The Vickers method allows you to determine the hardness of individual layers of metal, for example,
- a sample cemented during chemical thermal treatment.
- or a layer with a changed chemical composition (after surface hardening or alloying).
- In addition to galvanized surfaces, the method applies to nitrided materials.
Generally, the formula is not used practically, since the numerical values of the hardnesses are determined with the use of tables that are elaborated according to the diagonal of the footprint. Vickers hardness testers that are designed according to the desired demands.
How does Vickers hardness tester work?
The first part of the Vickers hardness test is the use of a diamond tip that makes an impression on the test material. The bit tip has a microscopic square pyramid shape. Some people call the diamond pyramid hardness test, or DPH, because of the shape of the tip. In large testing devices, the bit is positioned in a drill press-like tool that is lowered onto the test object. The tip of the bit is in contact with the material and the technician applies a controlled force for 10-15 seconds.
Testers use a digital gauge to indicate the amount of force applied. After removing the bit, the test object has an inverted pyramid-shaped depression. The press applies from 2.2 to 220.5 pounds (1–120 kg) of constant pressure, and the industry uses this force to test the hardness of anything from precious stones to metals. The micro-Vickers hardness test typically uses a constant force of 0.022 to 2.2 pounds (10 to 1000 grams). The industry uses a microtest to determine the hardness of thinner materials and special coatings.
Using a specially designed microscope, technicians measure the length of both diagonals of the print and average the numbers. They determine the hardness number using conversion tables or Vickers hardness testing software. The number is obtained by dividing the value of the force by the square of the diagonal mean and is written in a specific format, for example 500HV / 15. The number 500 indicates the level of hardness, and the number 15 indicates that the force was applied for 15 seconds.
Conclusion
The method for determining the Vickers hardness is based on the study of the dependence of the penetration depth of the diamond cone (indenter) into the material under study on the magnitude of the force. Since the Vickers hardness test is standardized in all hardness ranges, it is the most universal method for determining the hardness of an object. Vickers method, which makes it possible to measure both soft and hard materials of various thicknesses, hardness measurement is time-consuming and requires careful surface preparation.
The Vickers method is a method for measuring the hardness of metals and alloys, this measurement method is suitable for determining the hardness values of parts of small thickness made of ferrous and non-ferrous metals and alloys; parts hardened to a shallow depth, as well as parts with thin layers of galvanic coatings.
Vickers hardness testers can be manual or stand-alone computerized machines. Portable handheld testers have a force application device connected to a small digital monitor. Tabletop versions resemble large microscopes with a diamond tip positioned on a rotating target. These instruments apply the desired force, allowing technicians to measure the impression by placing microscopic lines on opposite diagonals. The internal software of most modern Vickers hardness testers automatically performs hardness calculations.
Disclaimer: This article contains sponsored marketing content. It is intended for promotional purposes and should not be considered as an endorsement or recommendation by our website. Readers are encouraged to conduct their own research and exercise their own judgment before making any decisions based on the information provided in this article.


